Sunday, December 3, 2017

Microsoft Excel cannot open or save any more documents because there is not enough available memory or disk space


Microsoft Excel cannot open or save any more documents because there is not enough available memory or disk space. To make more memory available, close workbooks or programs you no longer need. To free disk space, delete files you no longer need from the disk you are saving to.
This is really annoying especially you have tones of space and memory available.If you tried this and still not working:
Right click on the saved file, click on Properties and uncheck the option Block and then try to open the file and check.
And also did some setting in the trust center still not working, try the following.

To resolve this problem, start the Windows Firewall service:
Press the Windows logo key+R (to open the Run dialog box).
Type services.msc, and then click OK.
In the Services window, right-click Windows Firewall, and then click Start.


I know Windows Firewall suxk and we always disable it when we first got the PC/Laptop, but this trick, fixed my problem and I got my excel file to open. 


Yes, I don't understand neither.

Tuesday, August 1, 2017

Default profile for all user

Create a Profile Configuration Account

  1. While logged on as Administrator , create a local Windows user account named Profile and add it to the Administrators group
  2. Configure the profile:
    1. Log on as Profile
    2. Make desired profile, desktop, and application changes
    3. Log out

Copy the Customized Profile to "Default User"

  1. Log back on as Administrator (local)
  2.  Download defprof
  3. Copy defprof to C:\Windows\System32
  4. Run CMD
  5. C:\Windows\System32\defprof profile
  6. Logout and login with new user ID for testing.

Thursday, July 20, 2017

Running low on disk space on c:\ drive?

Need more space on C partition?

Here you can find more ways to clean files or to make more space on C partition

When you install you system operation on your computer is important to manage your hard disk very well, to avoid problems with space on partition C (system partition).

For more space on partition you can try for first time to clean up files you don’t need in 5 steps:

1.  Go to Start button


2. There you will find a spot to Search files or programs from computer


3. In the spot you need to write “RUN” and press Enter

4. In empty spot you need to write ”%temp%” and press Enter.


5. After that “Temp” folder open and you can delete all files from there.

How to rename files sequentially in Windows

It might sound strange but you don’t need to download any programs to perform a batch file rename in Windows.

All you need to do is to select all the files you want to change, right-click the first one in the list, select rename (or use F2), and type in the name.

This will automatically change all the other files with the same name followed by a suffix: (1), (2), and so on, just like in the image below:
Capture

Sunday, July 16, 2017

How to Find Your Computer's Name

Here’s a quick way to find out your computer’s name, something you might need often (like, when you are trying to connect a printer to multiple PCs). This method makes use of the command prompt in Windows.
Click on the start button, type cmd in the search box (In windows XP and older version, open run command, type “cmd” and press enter). Click on the result.


A command prompt window will open up. Type the word “hostname” and press enter.
Your computer name will appear. In my case it is “PGF-NB012”.
 
This way you can easily find your computer’s name.

How to Fix Microsoft Windows Search Indexer Stopped Working and Was Closed

“Microsoft Windows Search Indexer stopped working and was closed”
or
“Windows could not start the windows search service on the local computer error 1067”
There are a couple of things you can try out to fix this annoying as heck problem in Vista:

Rebuild Windows Vista’s Search Index

This method is quick and easy, but may not work if you are having serious issues. Still it’s worth a shot before going to the other steps where you have to delete stuff.
First, type Indexing Options in the Start Menu’s search box in Vista. Click on the Advanced tab and then click Rebuild.
windows search indexer
You can also try clicking on Restore Defaults if Rebuild does not work. If for some strange reason you are not able to select anything on this page, you can rebuild the searcher index manually by editing the following registry key:
HKLM/Software/Microsoft/Windows Search/SetupCompletedSuccessfully
to zero and then restarting the machine. However, if you can avoid registry key modifications that’s best! Also, make sure to create a restore point before making any registry edits.

Delete the Windows Search Index Program Folder

If the above method did not work, you can try to delete all of the files associated with search indexing in Vista by deleting everything inside these folders:
C:\ProgramData\Microsoft\Search\Data\Applications\Windows
C:\ProgramData\Microsoft\Search\Data\Temp
If you do not see these folders, you need to turn on viewing for hidden folders by going to Windows Explorer or My Computer and then choosing Tools, Folder Options. Go to the View tab and scroll down till you see “Show hidden files and folders“. You should now be able to see the ProgramData folder.
Again, make a backup of the files in the directories before deleting them just in case, but they really are not that important. If you get an Access is Denied message when trying to delete the files, you will first need to stop the Window Search Index service by going to Control Panel, then Administrative Tools, and then clicking on Services.
The service should be called Windows Search or Windows Searcher. Double click on the service and click Stop.
windows search service
After you delete the files, restart the computer and the index will be rebuilt and hopefully your error will be gone!
Hope that helps someone with a very annoying error! Remember the search index service is not critical, so you’re not going to mess up your computer by disabling the service or deleting it’s files.

How to use free file sync

Folder Comparison and Synchronization

Basic usage:

  1. Choose left and right folders.
    Choose left and right directories
  2. Compare them.
    Start comparison
  3. Select synchronization settings.
    Select synchronization settings
  4. Press Synchronize to begin synchronization.
    Press Synchronize to begin synchronization

Main Dialog Overview

FreeFileSync main window
  1. Start comparison
  2. Change comparison settings
  3. Include/exclude specific files
  4. Change synchronization settings
  5. Start synchronization
  6. Add folder pairs
  7. Select left and right folders
  8. Save/load configuration
  9. Tree overview panel
  10. Synchronization preview
  11. Select categories to show on grid
  12. Synchronization statistics

 Comparison Settings

Comparison settings dialog 

Comparison variants

When comparing two folders, FreeFileSync analyses the paths relative to the left and right base folders of the contained files. If the relative path matches, FreeFileSync decides how the file pair is categorized by considering the selected comparison variant:
I. Compare by File time and size
This variant considers two files equal when both modification time and file size match. It should be selected when synchronizing files with a backup location. Whenever a file is changed, its file modification time is also updated. Therefore, a comparison by File Time and size will detect all files that should be synchronized. The following categories are distinguished:
  1. file exists on one side only
    • left only
    • right only
  2. file exists on both sides
    1. different date
      • left newer
      • right newer
    2. same date
      • equal
      • conflict (same date, different size)

II. Compare by File content
Two files are marked as equal if they have identical content. This variant should be selected when doing consistency checks to see if the files on both sides are bit-wise identical. Naturally, it is the slowest of all comparison variants, so its usefulness for the purpose of synchronization is limited. If used for synchronization, it can serve as a fallback when modification times are not reliable. For example certain mobile phones and legacy FTP servers do not preserve modification times, so the only way to detect different files when the file sizes are the same is by reading their content.
  1. file exists on one side only
    • left only
    • right only
  2. file exists on both sides
    • equal
    • different content

III. Compare by File size
Two files are considered equal if they have the same file size. Since it's possible for files that have the same size to have different content, this variant should only be used when file modification times are not available or reliable, e.g. in certain MTP and FTP synchronization scenarios, and where a comparison by content would be too slow.
  1. file exists on one side only
    • left only
    • right only
  2. file exists on both sides
    • equal
    • different size

Symbolic Link Handling

FreeFileSync lets you choose to include symbolic links (also called symlinks or soft links) when scanning directories rather than skipping over them. When included, you can select between two ways to handle them:
  1. Follow: Treat symbolic links like the object they are pointing to. Links pointing to directories are traversed like ordinary directories and the target of each link is copied during synchronization.
     
  2. Direct: Evaluate the symbolic link object directly. Symbolic links will be shown as separate entities. Links pointing to directories are not traversed and the link object is copied directly during synchronization.

Exclude Items via Filter

File exclude filter

Files and directories are only considered for synchronization if they pass all filter rules. They have to match at least one entry in the include list and none of the entries in the exclude list as presented in the filter configuration dialog:
  • Each list item must be a file or directory path relative to synchronization base directories.
  • Multiple items must be separated by | or a new line.
  • Wild cards * and ? may be used: * means zero or more characters while ? represents exactly one character.

Example: Exclude items for mirror-sync from C:\Source to D:\Target

Filter descriptionFilter phrase
Single file C:\Source\file.txt\file.txt
Single folder C:\Source\SubFolder\SubFolder\
All files (and folders) named thumbs.db*\thumbs.db
All *.tmp files located in SubFolder\SubFolder\*.tmp
Files and folders containing temp somewhere in their path*temp*
Multiple entries separated by semicolon*.tmp | *.doc | *.bak
All subdirectories of the base directories*\
*.txt files located in subdirectories of base directories\*\*.txt

Example: Exclude a sub folder except for certain files

Set up two folder pairs with the same source and target paths but with distinct local filters:
Folder pair 1; local exclude filter: \SubFolder\
Folder pair 2; local include filter: \SubFolder\*.txt


Schedule a Batch Job

  1. Create a new batch job via FreeFileSync's main dialog: Menu → File → Save as a batch job...

    Setup a FreeFileSync batch job 
  2. By default, FreeFileSync will show a progress dialog during synchronization and will wait while the results dialog is shown. If the progress dialog is not needed, enable checkbox Run minimized. This will also skip the results dialog at the end.

    Alternatively, if you want to see the progress, but not to wait at the results dialog, it's sufficient to only select the On completion action Close progress dialog.

    Note
    Even if the progress dialog is not shown at the beginning, you can make it visible later during synchronization by double-clicking the FreeFileSync icon in the notification area.
  3. If you don't want error or warning messages to interrupt synchronization, set Handle errors to either Ignore or Stop.
     
  4. If log files are required, enable Save log and enter a folder path. If the path is left empty, the logs will be saved under the current user's roaming profile,%appdata%\FreeFileSync\Logs.
    Additionally, FreeFileSync always stores the result of the last synchronization in file LastSyncs.log (up to a user-defined size, see Expert Settings).
     
  5. Set up the FreeFileSync batch job in your operating system's scheduler:


A. Windows Task Scheduler:

  • Open the Task Scheduler either via the start menu, or enter taskschd.msc in the run dialog (keyboard shortcut: Windows + R).
  • Create a new basic task and follow the wizard.
  • Make Program/script point to the location of FreeFileSync.exe and insert the ffs_batch file into Add arguments.
  • Use quotation marks to protect spaces in path names, e.g. "D:\Backup Projects.ffs_batch"

    Windows Task Scheduler
Note
  • In Windows 7 Program/script always needs to point to an executable file like FreeFileSync.exe even when the ffs_batch file association is registered. If an ffs_batch file was entered instead, the task would return with error code 2147942593 (0x800700C1), "%1 is not a valid Win32 application".
    For Windows 8 and later this limitation does not apply and you may enter the ffs_batch file path directly into Program/script and leave out Add arguments.
  • If you schedule FreeFileSync to run under a different user account, note that settings (e.g. GlobalSettings.xml) will also be read from a different path, C:\Users\<username>\AppData\Roaming\FreeFileSync, or in the case of the SYSTEM account fromC:\Windows\System32\config\systemprofile\AppData\Roaming\FreeFileSync.


B. Windows XP Scheduled Tasks:

  • Go to Start → Control Panel → Scheduled Tasks and select Add Scheduled Task.
  • Follow the wizard and select FreeFileSync.exe as program to run.
  • Fill the input field Run: <FreeFileSync installation folder>\FreeFileSync.exe <job name>.ffs_batch

    Windows XP Task Scheduler
     

Synchronization Settings

Synchronization settings dialog 

Detect Moved Files

FreeFileSync is able to detect moved files on one side and can quickly apply the same move on the target side during synchronization instead of a slow copy and delete. To make this work, FreeFileSync requires database files (sync.ffs_db) to compare the current file system state against the time of the last synchronization.
The Two way variant already creates database files, therefore, detection of moved files is always active.
The Mirror variant however, does not need the database files to find synchronization directions, so detection of moved files is not available by default. If you don't mind the creation of the database files, you can enable this feature by selecting the Detect moved files checkbox.

Note
  • Detection of moved files is not yet possible when synchronizing a folder pair for the first time. Only beginning with the second sync the database files are available to determine moved files.
  • Detection is not supported by all file systems. Most notably, certain file moves on the FAT file system cannot be detected. Also virtualized file systems, e.g. a mounted WebDAV drive, might not support move detection. In these cases FreeFileSync will automatically fall back to copy and delete.

source : https://www.freefilesync.org

Friday, July 14, 2017

Keyboard shortcuts you should know

Using keyboard shortcuts can greatly increase your productivity. For example, to copy text, you can highlight text and press the Ctrl+C shortcut. The shortcut is faster than moving your hands from the keyboard, highlighting with the mouse, choosing copy from the file menu, and then returning to the keyboard.

Below are the top 10 keyboard shortcuts we recommend everyone memorize and use.

Ctrl+C or Ctrl+Insert and Ctrl+X
Both Ctrl+C and Ctrl+Insert will copy highlighted text or a selected item. If you want to cut an item instead of copying it, press Ctrl+X. This action removes the text or item and stores it in the clipboard for you, rather than just copying it to the clipboard while leaving the original behind.
 
Ctrl+V or Shift+Insert
Both the Ctrl+V and Shift+Insert will paste the text or object that's stored in the clipboard.

Ctrl+Z and Ctrl+Y
Pressing Ctrl+Z will undo any change. For example, if you cut text, pressing this key combination will undo the cut. These shortcuts can also be pressed multiple times to undo or redo multiple changes. Pressing Ctrl+Y would redo the undo.

Ctrl+F
Pressing Ctrl+F opens the Find field, which allows you to search the text currently displayed in any program that supports it. For example, Ctrl+F can be used in your Internet browser to find text on the current page. Press Ctrl+F now to open the Find in your browser and search for "shortcut" to display each time shortcut is mentioned on this page.

Alt+Tab or Ctrl+Tab
Pressing Alt+Tab switches between open programs moving forward. For example, if you have your browser window open and other programs running in the background press and hold Alt and then press the tab key to cycle through each open program.

Ctrl+Backspace and Ctrl+Left or Right arrow
Pressing Ctrl+Backspace will delete a full word at a time instead of a single character.

Holding down the Ctrl key while pressing the left or right arrow will move the cursor one word at a time instead of one character at a time. If you want to highlight one word at a time, hold down Ctrl+Shift, then press the left or right arrow key. Your highlighted selection will move one word at a time in that direction.

Ctrl+S
While working on a document or other file in almost every program, pressing Ctrl+S saves that file. Use this shortcut key frequently if you're working on anything important in case an error happens, you lose power, or any other issues that could cause you to any work since the last save.

Ctrl+Home or Ctrl+End
Ctrl+Home will move the cursor to the beginning of the document, and Ctrl+End will move the cursor to the end of a document. These shortcuts work with most documents, as well as web pages.

Ctrl+P
Ctrl+P is used to open a print preview of the page or document currently being viewed. For example, press Ctrl+P now to view a print preview of this page.

Page Up, Spacebar, and Page Down
As you may have guessed, pressing either the page up or page down key will move to the next or previous page. When browsing the Internet, pressing the spacebar moves the scrollbar down a page. Similarly, Shift+spacebar moves the scrollbar up one page.

source: https://www.computerhope.com/tips/tip79.htm

Thursday, July 13, 2017

How do you backup your important file?


Digital data is already become part of our life, and it can only growing bigger. Losing your important data is a pain in the A**. Your hard work for many years probably gone just like that. Hard drive failure, is the most common main caused of the data loss.


Here I talk about the important of data backup: https://howtobeitexe.blogspot.my/2017/07/why-backup-your-file-is-important.html


But how should you backup your data in the most efficient way? Below is some tips for you.


First, you need to be organized. Don't keep all your data on desktop, especially important data!

This will only make your life hard to do the backup job!

Move all the critical data in one location, create second parturition of your pc/laptop hard drive and move everything there.
If you don't know how to create a partition, just create a folder on C: drive and put everything.


Make your data centralized will minimized all your backup work in the later stage.


So, how to do backup for all the important data?


1. External Hard Drive.

This kind of hard drive is getting cheap nowadays with variant of hard disk space for you to choose. You can either choose 3.5in or 2.5in of the external hard drive as your backup hard drive, the hard disk space is depend how much data you need to backup.

Once in a while just plug it in your computer and copy all the file that you wish to backup to the external hard drive. You can do it daily, weekly or anytime you wish to backup your file.

2. Install extra hard drive to your desktop computer.

If you're using desktop computer, this is a good way to duplicate your data as well. you can either do it like external hard drive way, copy all the file manually or setup raid mirror. This way the second hard drive will be identical to the main hard drive, whenever the main hard drive is failed, just swap the backup hard drive as main hard drive and buy another new hard drive to do the raid mirror again, this way no data loss will happen. Unless both the hard drive failed at the same time.

3. NAS - Network Attached Storage
It work just like the external hard drive, just that it's connected to the network. There's no need to connect this to your PC/laptop. More than one pc/desktop can connect to this device and do the backup.


4. NAS with RAID setup


This is another kind of NAS, the different with the previous NAS is you can add in the hard disk size that you desire. 1TB, 2TB or even 5TB is all up to you. In the market there's different kind of case, the one in the picture is only for 2 hard drive, you can buy the one with 4 slots, 6 slots or even more if your data is very big.
The advantage of this is you can setup raid, to understand more on raid: https://www.prepressure.com/library/technology/raid


5. Thumb Drive

This is a not recommended way to do your backup, reason is it's small in space, you're need more thumb drive to do your data backup. It's small in size, this thing can easily just went hiding and you'll never found it again. And it's not very reliable, in the place where I work, most of the time, data loss is because of faulty thumb drive. So I always not recommend people to do their backup with this.


For me, one backup is not always enough for me. I'll always have 2 copies of backup for my data. That way, I feel less worried that one day I'll lost all my data. I'm even thinking to do off-site backup now, soon or sooner.

Why backup your file is important?


Digital is already become part of our life now. More and more peoples keeping their important data in digital format, such as family photos, videos, bank documents, insurance documents and etc.
Having important files on your computer is certainly something that everyone does but it seems like people do not know how to take care of them. You will find that people will rarely back their computers up and then go through the pain and stress of losing all of their files. This is something that most people ignore yet they complain once it happens to them. There are several reasons why it is crucial to backup your files and to make sure that you always have a copy.
Why Backup?
• Emergencies
You must understand that you never know when your computer or hard drive will simply give up. Whether you have a brand new PC or an old PC, the computer can somehow crash. This is something that can happen at anytime and so you need to be aware of this. Backing up your files should become a habit that you do on a weekly or even daily basis, depending on how much work you do.
• Less Stress
It can be quite stressful to have to think about your files and hoping that they don’t disappear. It is a hassle to have to find lost files and then hope that you can find them again. Remember that most people will just ignore having an external hard drive and this is something that you can’t do. You must focus on being able to find a hard drive that will fit your files and give you all the space that you need.
• Convenience
It is very convenient to have your whole computer on a single hard drive. You can find hard drives that are very affordable and you don’t have to buy one that is too big. Simply buy a hard drive that is enough for the files that you have but always make room for some extra files. Remember that video files can be very space consuming and so you should always keep this in mind when looking to buy an external hard drive.
The process of finding a good hard drive is really all about making sure that you have all the files that you need in one place. If you just need a 500GB hard drive, then that would be more than enough. As long as you know the importance, you will certainly benefit from an external hard drive.

source: https://cksolutions.ie/importance-backing-files

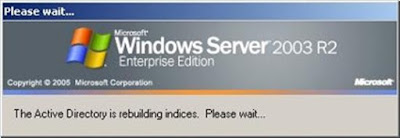
The active directory is rebuilding indices please wait...

Problem Error "The active directory is rebuilding indices please wait” in Windows Server 2003. Operating system Windows 2003 server...