Showing posts with label microsoft office. Show all posts

Tuesday, November 6, 2018

How to enable/disable Protected View in Office 2016 Word/Excel/PowerPoint

An Office document that opens in protected view mode can’t be edited. If you trust the source of this document, just need to click the Enable editing button to remove the "Protected view" so that you can edit the document. However, this is temporary. Next time you open a Word document, it will still open in protected view mode. To permanently disable "Protected View" in Office 2016, do as follows.

Step 1: Open one already existing Office document, such as Word. Or create and open a new Office document.

Step 2: Select the File -> Options tab.


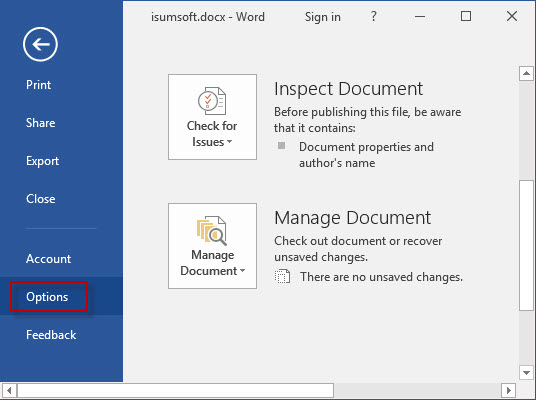
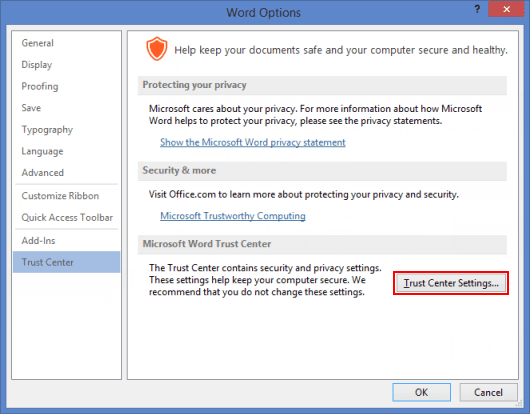
Step 3: After the Word Options dialog opens, select Trust Center on the left-side pane, and then click Trust Center Settings button on the right-side pane. 


Step 4: After the Trust Center dialog opens, select Protected View. "Protected View" is enabled by default. To disable it, uncheck the boxes next to the corresponding items and click OK. If you want to disable "Protected View" in Excel/PowerPoint 2016, the steps are the same.


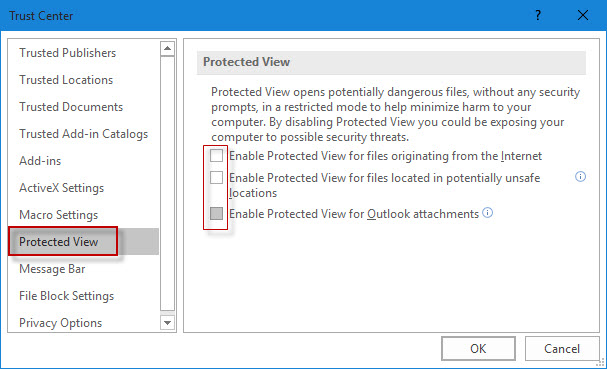
Then you won’t be prompted with the Protected View warning next time when you open an Office file downloaded/received from the internet or other location.

Tips: "Protected View" is actually one very useful feature to secure computer system from potential dangerous programs/files. Once a Word/Excel/PowerPoint document is received from the Internet or other places, Office program will detect it. Once potential safety problems are found, Office will open the document in an environment isolated from the computer system, which is just the "Protected View". This prevents the virus or malware running on your computer. Hence, You are not recommended to disable “Protected View” feature in Office 2016/2013/2010 unless you are pretty sure you won’t open any potentially unsafe Office files or you’ve installed anti-virus software on your computer.


source: https://www.isumsoft.com/office/disable-protected-view-in-office-2016.html

Sunday, September 30, 2018

Microsfot Office always ask to activate

Office repeatedly prompts you to activate on a new PC


When you install a volume license version of Office Standard or Office Professional Plus on a new PC, you might be prompted with a Let's get started screen each time you start Office. This can happen if you don't uninstall the pre-installed version of Office on your new PC before installing a volume license version of Office.
A screenshot that shows the default try, buy, or activate options for a PC that comes with Office pre-installed.
To stop the prompts for activation, make sure your Office uses volume licensing and then update the registry.

Verify that your Office version uses volume licensing

Volume license versions of Office are typically used by large organizations. Here's how to check if your version of Office uses volume licensing:
  1. Open a document in Word.
  2. Go to File > Account.
  3. Compare your screen to this screen shot and look for the following.

    • Volume license versions are named Office Standard or Office Professional Plus
    • Volume license versions have a Change Product Key link.


If you see buttons named Manage Account or Update Options, you're not using a volume license version of Office.

Update the registry to remove the Office 365 activation prompt

Important: This task contains steps that tell you how to modify the registry. However, serious problems might occur if you modify the registry incorrectly. Therefore, make sure that you follow these steps carefully. For added protection, back up the registry before you modify it. Then, you can restore the registry if a problem occurs.
  1. Close the activation window and all Office apps.
  2. Right-click the Start button Windows Start button in Windows 8 and Windows 10 on the lower-left corner of your screen, and select Run.
  3. Type regedit, and then press Enter. Select Yes when prompted to open the Registry Editor.
  4. On the left side of the Registry Editor, under Computer, navigate to the following key in the registry:
    HKEY_LOCAL_MACHINE\SOFTWARE\Wow6432Node\Microsoft\Office\16.0\Common\OEM
  5. Right click the OEM value and click File>Export.
  6. Save the key.
  7. After the key is backed up, select Edit>Delete.
  8. Repeat steps 3-6 for the following key:
    HKEY_LOCAL_MACHINE\SOFTWARE\Microsoft\Office\16.0\Common\OEM
  9. Close the Registry Editor and start Office again.

Monday, September 24, 2018

How to Enable Typing Slashes in Cells in Excel


By default, the slash (/) key displays the shortcuts to the commands on the ribbon in Excel. So, what do you do if you want to enter a slash in a cell? There’s a way to disable this setting so you can type a slash in cells.
To prevent the slash key from activating the ribbon command shortcuts, click the “File” tab.
On the backstage screen, click “Options” in the list of items on the left. 


 On the “Excel Options” dialog box, click “Advanced” in the list of items on the left.


In the “Lotus compatibility” section, change the character in the “Microsoft Excel menu key” edit box from a slash to a different character, such as a tllde (~) or a grave accent (`). Make sure the character you choose is one you won’t be using in the cells.
Click “OK” to accept the change and close the “Excel Options” dialog box.

Now you can type a slash in any cell in your worksheet.


Again, the character you entered as the “Microsoft Excel menu key” is not available to type in the cells.

The active directory is rebuilding indices please wait...

Problem Error "The active directory is rebuilding indices please wait” in Windows Server 2003. Operating system Windows 2003 server...