How to boot into Safe Mode in Windows 10?
Way 1: Enter Safe Mode when you can’t boot normally
Safe Mode loads with a minimum set of drivers, software and service. Usually, when Windows doesn’t start normally, Safe Mode starts with no problem. It’s useful for you to troubleshoot the problem there.
This way works effectively when you can’t boot Windows 10 normally.
1) Ensure your PC is off.
2) Press the power button to turn on your PC, then hold the power button down until PC shuts down automatically (about 5 seconds) . Repeat this more than 2 times until you see the Preparing Automatic Repair (see below screenshot).
Note: This step is aim to bring up Preparing Automatic Repair screen. When Windows doesn’t boot properly, this screen pops up and Windows attempts to fix the problem by itself. If you’ve seen this screen at the first time when you power up the computer, skip this step.

Then wait for Windows to diagnose your PC.

2) Click Advanced options, then the system will bring up the Windows RE (Recovery environment.) screen.

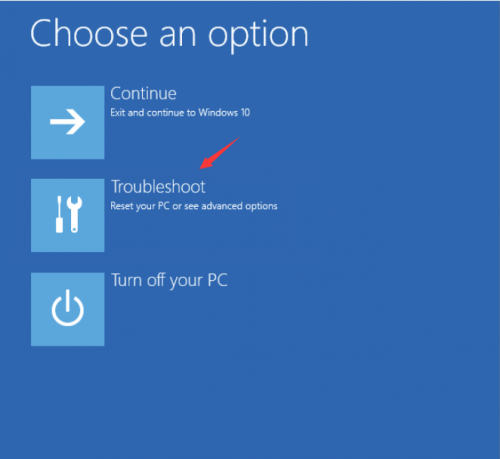
3) On the Windows RE (Recovery environment) screen, click Troubleshoot.
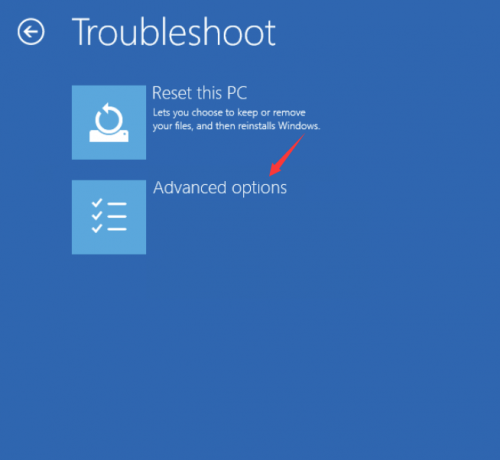
4) On the Troubleshoot screen, click Advanced options.
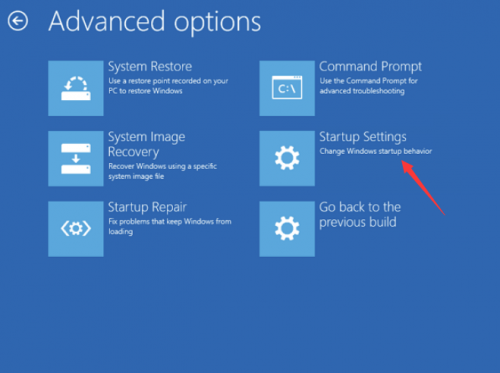
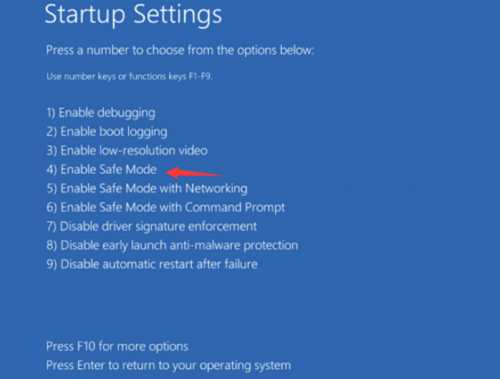
5) Click Startup Settings to continue.
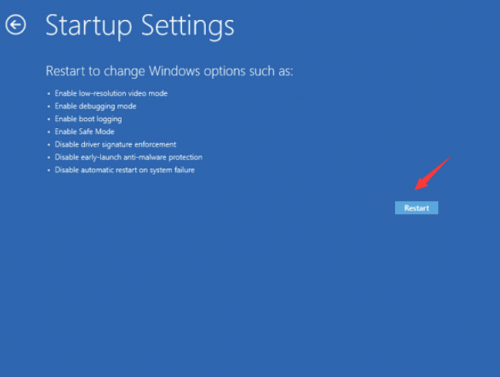
6) Click Restart. The computer restarts and another screen opens showing a list of different startup options.
7) On your keyboard, press the 4 number key to enter Safe Mode without network. (If you need to do some online research after boot into the safe mode, press the 5 number key to enter Safe Mode with network access.)
Way 2: Enter Safe Mode from Normal Mode
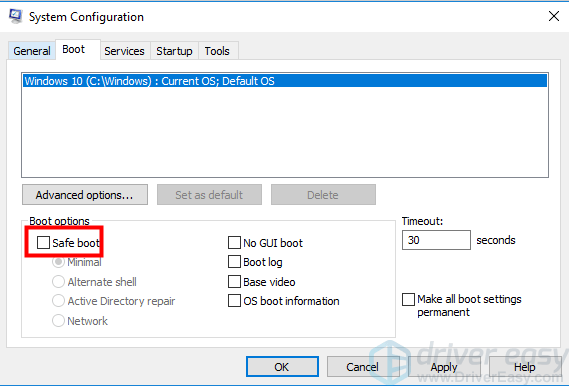
If you’ve started Windows normally, you can boot into the safe mode using the System Configuration tool. The System Configuration tool allows you to configure how your PC starts, the boot procedure, the startup items, etc.
Follow below instructions to open the System Configuration tool and set Windows starts in Safe Mode. Just 4 steps:
1) On your keyboard, press the Win+R (Windows logo key and R key) at the same time to invoke the Run box.
2) Type msconfig and click OK. Then the System Configurations will open.

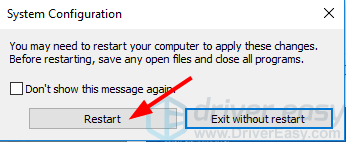
4) When you’re prompted to restart your computer to apply these changes, click Restart then you will boot into the Safe Mode.
IMPORTANT: If you want to start Windows 10 in Normal Mode, ensure Safe boot is unchecked.
Way 3: Start Safe Mode from the login screen
If you can boot to the login screen, you can enter Safe Mode from the login screen. The steps are similar with the steps of Way 1.
1) On your keyboard, hold down the Shift key.
2) While holding down the Shift key, on the login screen (you may call it sign in screen), at the bottom right of the corner, click the power button then select Restart. Then Windows will bring up the Windows RE (Recovery environment) screen.

3) On the Windows RE (Recovery environment) screen, click Troubleshoot.
4) On the Troubleshoot screen, click Advanced options.
5) Click Startup Settings.
6) Click Restart. The computer restarts and another screen opens showing a lot of different startup options.
7) On your keyboard, press the 4 number key to enter Safe Mode without network. (If you need to do some online research after booting into the safe mode, press the 5 number key to enter Safe Mode with network access.)
credit: https://www.drivereasy.com/knowledge/how-to-enter-safe-mode-in-windows-10/