Sunday, September 30, 2018

Microsfot Office always ask to activate

Office repeatedly prompts you to activate on a new PC


When you install a volume license version of Office Standard or Office Professional Plus on a new PC, you might be prompted with a Let's get started screen each time you start Office. This can happen if you don't uninstall the pre-installed version of Office on your new PC before installing a volume license version of Office.
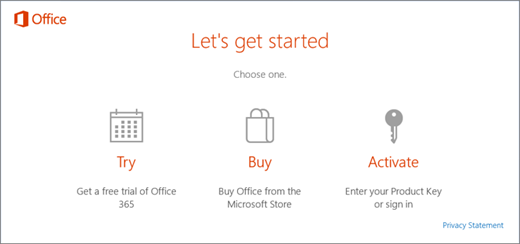
A screenshot that shows the default try, buy, or activate options for a PC that comes with Office pre-installed.
To stop the prompts for activation, make sure your Office uses volume licensing and then update the registry.

Verify that your Office version uses volume licensing

Volume license versions of Office are typically used by large organizations. Here's how to check if your version of Office uses volume licensing:
  1. Open a document in Word.
  2. Go to File > Account.
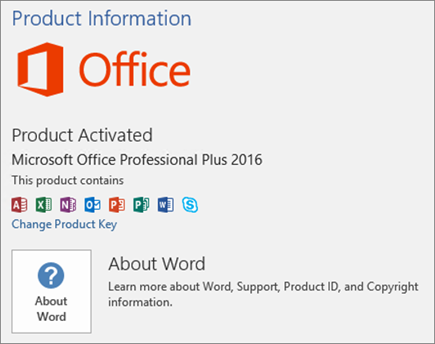
  3. Compare your screen to this screen shot and look for the following.

    • Volume license versions are named Office Standard or Office Professional Plus
    • Volume license versions have a Change Product Key link.


If you see buttons named Manage Account or Update Options, you're not using a volume license version of Office.

Update the registry to remove the Office 365 activation prompt

Important: This task contains steps that tell you how to modify the registry. However, serious problems might occur if you modify the registry incorrectly. Therefore, make sure that you follow these steps carefully. For added protection, back up the registry before you modify it. Then, you can restore the registry if a problem occurs.
  1. Close the activation window and all Office apps.
  2. Right-click the Start button Windows Start button in Windows 8 and Windows 10 on the lower-left corner of your screen, and select Run.
  3. Type regedit, and then press Enter. Select Yes when prompted to open the Registry Editor.
  4. On the left side of the Registry Editor, under Computer, navigate to the following key in the registry:
    HKEY_LOCAL_MACHINE\SOFTWARE\Wow6432Node\Microsoft\Office\16.0\Common\OEM
  5. Right click the OEM value and click File>Export.
  6. Save the key.
  7. After the key is backed up, select Edit>Delete.
  8. Repeat steps 3-6 for the following key:
    HKEY_LOCAL_MACHINE\SOFTWARE\Microsoft\Office\16.0\Common\OEM
  9. Close the Registry Editor and start Office again.
Thursday, September 27, 2018

Print Word Document without Comments

Print Word Documents without Comments on Word 2016
  1. Open your word document.
  2. Click on "Show Markup" in the tracking group found on the "Review" Tab.
  3. Then clear the comments Check box.

OR:
  1. Go to the File tab and click on "Print".
  2. Click on arrow next to "Print All Pages" under Settings.
  3. Click on "Print Markup".

Print Word Documents without Comments on Word 2007

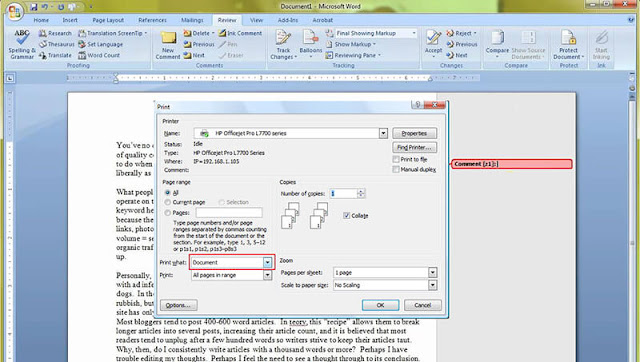
  1. Go to "Review" tab and click on "Show Markup" in the tracking group.
  2. Clear the comment check box
  3. Click "print" and change the "Print What" box to Document.
  4. Then click on "OK" to complete the process.

 
 With these steps above, you can easily print word documents without comments.

'Blue Screen Of Death’ When Booting From WinXP CD


When booting from my WinXP installation disc, the system began loading all the files and drivers as it normally would and then froze and goes to the dreaded Blue Screen Of Death or BSOD. After a lot of rooting around it turned out a setting in the BIOS was the cause of the problem.
To fix it, entered the computers BIOS while it was booting up by pressing F2 (most computers use the Del key). Then go to ‘Advanced’ -> ‘IDE Configuration’ -> Changed ‘SATA Operation Mode’ from ‘Enhanced’ to ‘Compatible’ and then Exit & Save Changes by pressing F10.
Boot from your XP CD and voila! It should work.

Monday, September 24, 2018

How to Enable Typing Slashes in Cells in Excel


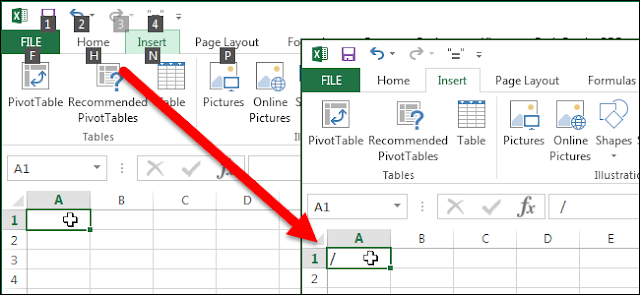
By default, the slash (/) key displays the shortcuts to the commands on the ribbon in Excel. So, what do you do if you want to enter a slash in a cell? There’s a way to disable this setting so you can type a slash in cells.
To prevent the slash key from activating the ribbon command shortcuts, click the “File” tab.
On the backstage screen, click “Options” in the list of items on the left. 


 On the “Excel Options” dialog box, click “Advanced” in the list of items on the left.


In the “Lotus compatibility” section, change the character in the “Microsoft Excel menu key” edit box from a slash to a different character, such as a tllde (~) or a grave accent (`). Make sure the character you choose is one you won’t be using in the cells.
Click “OK” to accept the change and close the “Excel Options” dialog box.

Now you can type a slash in any cell in your worksheet.


Again, the character you entered as the “Microsoft Excel menu key” is not available to type in the cells.

Thursday, April 5, 2018

How to boot into Safe Mode in Windows 10?

How to boot into Safe Mode in Windows 10?

Way 1: Enter Safe Mode when you can’t boot normally

Safe Mode loads with a minimum set of drivers, software and service. Usually, when Windows doesn’t start normally, Safe Mode starts with no problem. It’s useful for you to troubleshoot the problem there.
This way works effectively when you can’t boot Windows 10 normally. 
1) Ensure your PC is off.
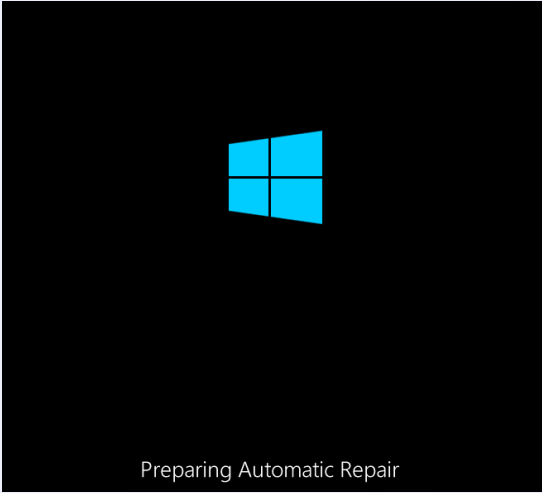
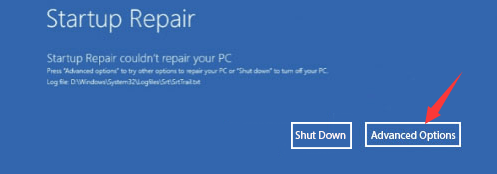
2) Press the power button to turn on your PC, then hold the power button down until PC shuts down automatically (about 5 seconds) . Repeat this more than 2 times until you see the Preparing Automatic Repair (see below screenshot).
Note: This step is aim to bring up Preparing Automatic Repair screen. When Windows doesn’t boot properly, this screen pops up and Windows attempts to fix the problem by itself. If you’ve seen this screen at the first time when you power up the computer, skip this step.
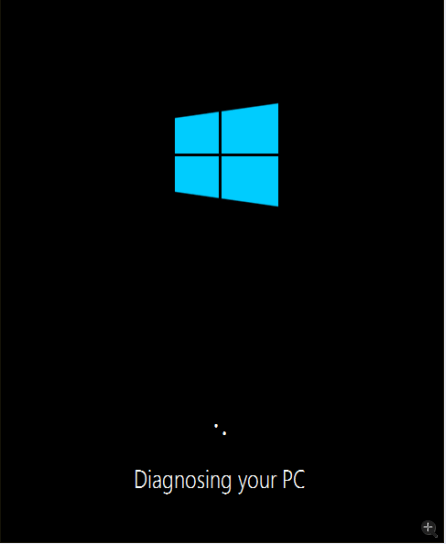
Then wait for Windows to diagnose your PC. 
2) Click Advanced options, then the system will bring up the Windows RE (Recovery environment.) screen.
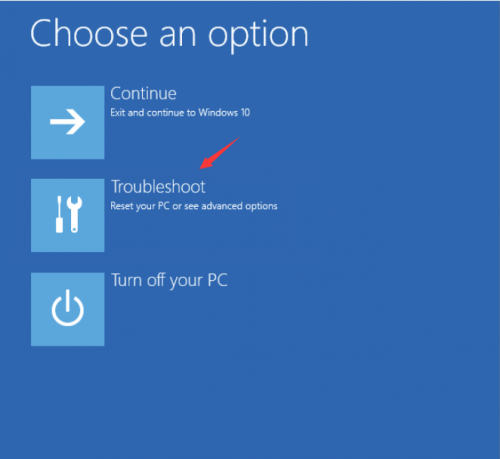
3) On the Windows RE (Recovery environment) screen, click Troubleshoot.
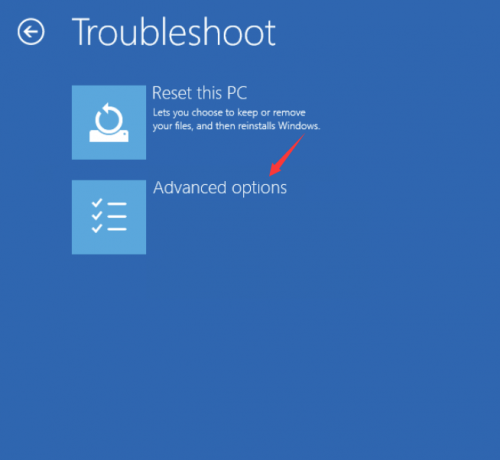
4)  On the Troubleshoot screen, click Advanced options.
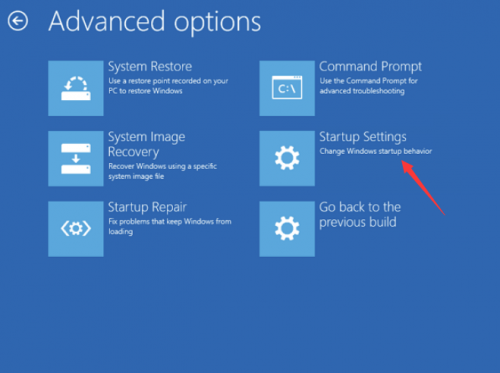
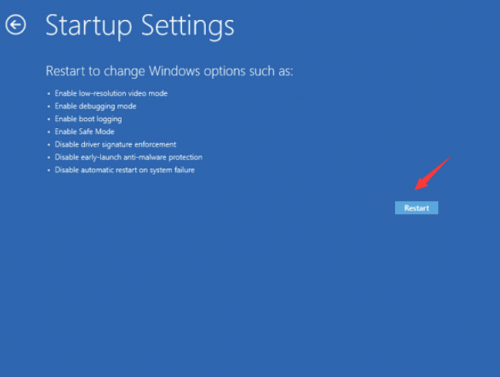
5) Click Startup Settings to continue.
6) Click Restart. The computer restarts and another screen opens showing a list of different startup options.
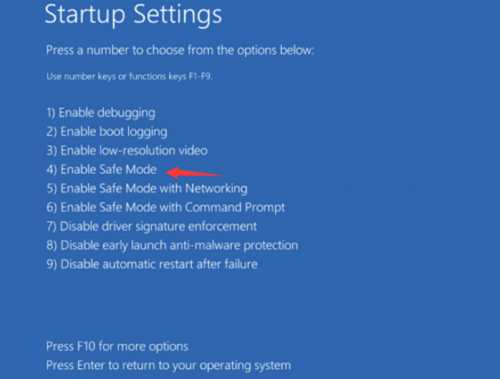
7) On your keyboard, press the number key to enter Safe Mode without network. (If you need to do some online research after boot into the safe mode, press the 5 number key to enter Safe Mode with network access.)


Way 2: Enter Safe Mode from Normal Mode

If you’ve started Windows normally, you can boot into the safe mode using the System Configuration tool. The System Configuration tool allows you to configure how your PC starts, the boot procedure, the startup items, etc.
Follow below instructions to open the System Configuration tool and set Windows starts in Safe Mode. Just 4 steps:
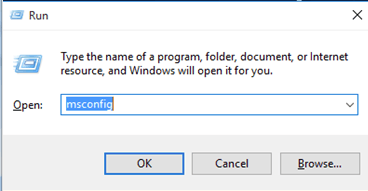
1) On your keyboard, press the Win+R (Windows logo key and R key) at the same time to invoke the Run box.
2) Type msconfig and click OK. Then the System Configurations will open.

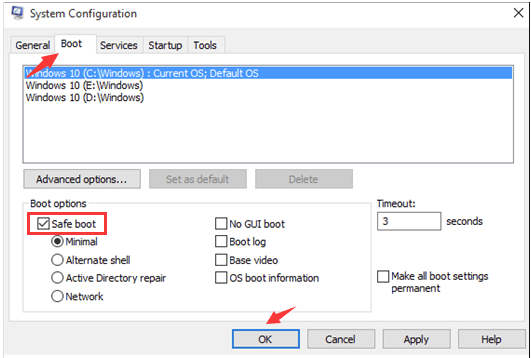
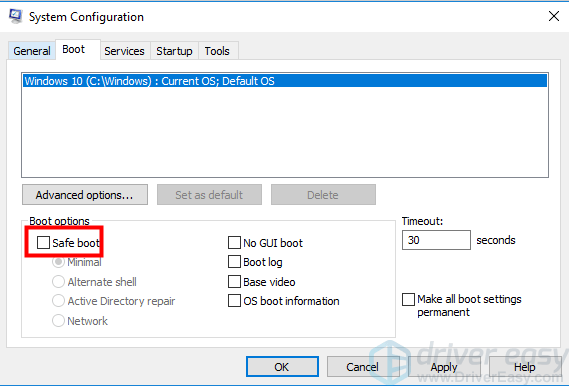
3) When System Configuration opens, click the Boot tab. Under Boot options, check Safe boot then click OK.

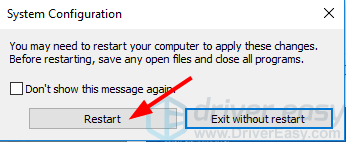
4) When you’re prompted to restart your computer to apply these changes, click Restart then you will boot into the Safe Mode.
IMPORTANT: If you want to start Windows 10 in Normal Mode, ensure Safe boot is unchecked.

Way 3: Start Safe Mode from the login screen

If you can boot to the login screen, you can enter Safe Mode from the login screen. The steps are similar with the steps of Way 1.
1) On your keyboard, hold down the Shift key.
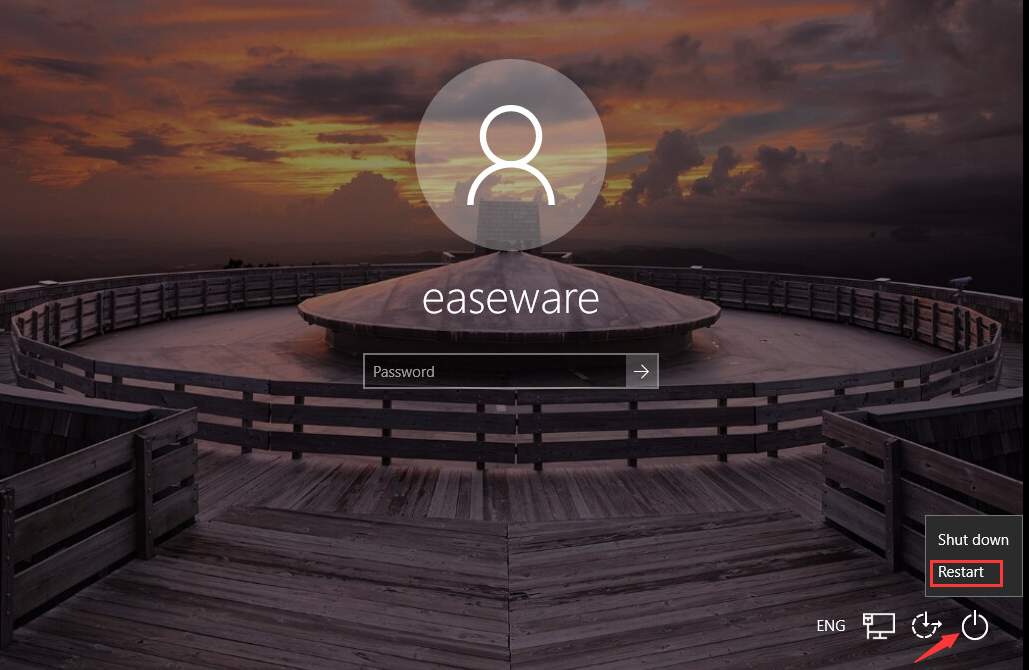
2) While holding down the Shift key, on the login screen (you may call it sign in screen), at the bottom right of the corner, click the power button then select Restart. Then Windows will bring up the Windows RE (Recovery environment) screen.
3) On the Windows RE (Recovery environment) screen, click Troubleshoot.
4)  On the Troubleshoot screen, click Advanced options.
5) Click Startup Settings.
6) Click Restart. The computer restarts and another screen opens showing a lot of different startup options.
7) On your keyboard, press the number key to enter Safe Mode without network. (If you need to do some online research after booting into the safe mode, press the 5 number key to enter Safe Mode with network access.)
credit: https://www.drivereasy.com/knowledge/how-to-enter-safe-mode-in-windows-10/

Thursday, March 22, 2018

Scan suspicious attachment

Ever received attachment from unknown person and not sure to open it or not? Follow the instruction below to confirm that the attachment is OK to open.

1. First, download the attachment to your computer, it's OK to download the suspicious file, as long as you're not open it.
2. Save the file to a folder.


3. After that go to this website >>  https://www.virustotal.com


4. Click on Upload and scan file.

5. Select the suspicious file that you just downloaded and open it.

6. And the website will do the scanning and show you the result. The result of this file shows that it's a virus file.

7. Return to the email and Report it as spam. Lastly delete the suspicious file that you downloaded just now.

Sunday, December 3, 2017

Microsoft Excel cannot open or save any more documents because there is not enough available memory or disk space


Microsoft Excel cannot open or save any more documents because there is not enough available memory or disk space. To make more memory available, close workbooks or programs you no longer need. To free disk space, delete files you no longer need from the disk you are saving to.
This is really annoying especially you have tones of space and memory available.If you tried this and still not working:
Right click on the saved file, click on Properties and uncheck the option Block and then try to open the file and check.
And also did some setting in the trust center still not working, try the following.

To resolve this problem, start the Windows Firewall service:
Press the Windows logo key+R (to open the Run dialog box).
Type services.msc, and then click OK.
In the Services window, right-click Windows Firewall, and then click Start.


I know Windows Firewall suxk and we always disable it when we first got the PC/Laptop, but this trick, fixed my problem and I got my excel file to open. 


Yes, I don't understand neither.

Tuesday, August 1, 2017

Default profile for all user

Create a Profile Configuration Account

  1. While logged on as Administrator , create a local Windows user account named Profile and add it to the Administrators group
  2. Configure the profile:
    1. Log on as Profile
    2. Make desired profile, desktop, and application changes
    3. Log out

Copy the Customized Profile to "Default User"

  1. Log back on as Administrator (local)
  2.  Download defprof
  3. Copy defprof to C:\Windows\System32
  4. Run CMD
  5. C:\Windows\System32\defprof profile
  6. Logout and login with new user ID for testing.

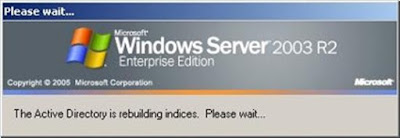
The active directory is rebuilding indices please wait...

Problem Error "The active directory is rebuilding indices please wait” in Windows Server 2003. Operating system Windows 2003 server...