Thursday, July 6, 2017

Step-by-step Guide On How To Setup OpenVPN From pfSense’s Web-GUI

  • Step 1: For the first step, you need to create a Certificate Authority that will be used to sign future user certificates. So whenever you create a new user certificate, this Certificate Authority shall be in charge in signing those newly created certificates. To do this, you must login to pfSense webConfigurator or admin web page, by accessing its IP address using a browser. So type in 192.168.0.250 and press Enter key. Login by supplying the correct data for the admin user and user-password. Upon logging in, navigate to Main Menu -> System -> Cert Manager. Make sure you’re on the CAs tab, to add a new CA (Certificate Authority), click on plus + button. A new page should open, now fill up the necessary fields.
    This is how I did:
    • Method – Create an internal Certificate
    • Descriptive name – matrixCA
    • Method – Create an internal Certificate Authority
    • Key length – 2048 bits
    • Digest Algorithm – SHA256
    • Lifetime – 3650
    • Common Name – Internal-CA
Those are the most important fields to fill up on this page. But don’t miss to fill up the Country Code, State or Province, City, Organization and Email Address. Enter what’s applicable to you. Save your settings by clicking the Save button.
Step 2: While still on the Certificates tab, add another certificate by clicking the plus button. This process is similar to the steps you took under Step 1. But this time, you’ll be creating a Server Certificate for OpenVPN Server. Click the add button again and fill up the necessary fields like so:
  • Method – Create an internal Certificate
  • Descriptive name – matrix-VPN-Server-Cert
  • Certificate authority – MyCA
  • Key length – 2048 bits
  • Digest Algorithm – SHA256
  • Certificate Type – Server Certificate
  • Lifetime – 3650
  • Common Name – vpn.matrix.com
Note: Substitute the values with your own data. Fill up the other fields; Country Code, State or Province, City, Organization and Email Address. Then to save your settings.
Step 3: The third step you should take is to create a new user account for the VPN client to use. While still on Certificate Manager page, do the next step below. Navigate to Main Menu -> System -> User Manager.
You should be now at the
User Manager page. On this page, create a new user by clicking plus + button, you should be taken to a new page where you should enter the details of the new user account. Fill up the Username field, Password fields twice, Full name, Expiration date (blank = no expiration). In my case, I named my first user account as username.
Note: Remember to create a corresponding certificate for this user.
Tick the check-box next to Click to create a user certificate dialog. It should expand and let’s you fill the necessary fields to create a new user certificate.
Fill up the Descriptive Name field. Make it similar with your user account name. In my case, I named my first VPN user account as username, while I put username-certas my certificate Descriptive Name. Fill up Certificate Authority, but this should be automatically filled showing an entry that you’ve previously made from step 1, the Certificate Authority (CA). So in this case, matrixCA should show up here. Select a Key Length for the certificate, in my case I chose 2048.
Finally, save your settings by clicking the Save button.
Step 4: Next you should install the OpenVPN Client Export Utility from the package manager page. Take the next steps below. Navigate to main menu -> System -> Packages -> Available Packages. You should see a list of available packages. Now scroll further down below and look for the package name OpenVPN Client Export Utility. To install the package, click the add + button and you should be taken to a new sub-page. Click the Confirm button to start the installation.
You’ll have a hint about the progress of the install process by watching your screen. Upon successful installation, you should see a message Installation completed.
Step 5: While still logged in, navigate to main menu then VPN -> OpenVPN. 
You should be now on the OpenVPN Server page, now click the Wizards tab, to start a wizard-assisted configuration. A new page should open, entitled OpenVPN Remote Access Server Setup Wizard. On this page, select Local User Access for Type of Server:, then click Next.
On the next page, choose a Certificate Authority (CA). Select the CA you’ve previously created from step 1 of this guide. In this case, it’s the
matrixCA. Click Next to continue. The next page should ask you to choose a Server Certificate. You had created this already from step 2 above, and in this case it’s the matrix-VPN-Server-Cert. In case you named it like you wished, then choose that entry as your server certificate. Then click Next when done.
The next page contains a long list of field set. The first field set that you should see is the
General OpenVPN Server Information field set. This is how I filled those up. General OpenVPN Server Information:
  • Interface = WAN
  • Protocol = UDP
  • Local Port = 1194
  • Description = matrix-VPN-Server-LAN

For a site-to-site implementation of OpenVPN, Interface should be set to WAN. Cryptographic Settings:
  • Cryptographic Settings = Enable authentication of TLS packets – CHECKED
  • Generate TLS Key = Automatically generate a shared TLS authentication key = CHECKED
  • DH Parameters Length = 2048
  • Encryption Algorithm = AES-256-CBC (256-bit)
  • Hardware Crypto = No Hardware…
Tunnel Settings:
  • Tunnel Network = 192.168.30.1/24
  • Redirect Gateway = Force all client generated traffic through the tunnel = CHECKED
  • Local Network = 192.168.1.0/24 > Note: Leave Local Network blank if you don’t want to add a route to your LAN, using this VPN tunnel.
  • Concurrent Connections = 10
  • Compression = CHECKED
Client Settings:
  • Dynamic IP = CHECKED
  • Address Pool = CHECKED
Note: Other fields that were not mentioned here, were left blank. After filling those necessary fields, click next to advance to the next page. The next page should be the Firewall Rule Configuration Page. This is what I did to this page.
  • Firewall Rule = CHECKED
  • OpenVPN Rule = CHECKED
After doing the above step, click NEXT and then finally, click FINISH. You should be taken back to the Server` tab.
At this point, you’ve already configured a working OpenVPN Server in pfSense. Next step will be to export your user config files for your chosen VPN client. A client could be a Windows machines, Android Devices, Mac or Linux machines. You need to export the client configuration file by downloading the file from pfSense’s webConfigurator page, using OpenVPN Client Export utility.

How to Fix Microsoft Office Error code 0-1009 (0)

How to Fix Microsoft Office Error code 0-1009 (0)

Error code 0-1009 (0)   :  Microsoft office application is now an important element of our day to day life as it deals about our studies, work, business etc. And as it is a development era Microsoft has launched the well developed and secured products such as Office 365 and Office 2016 and also Office 2013 which was precede of Office 365 and Office 2016. You could buy the Office product from Microsoft product list or store .And in some cases the installation or update of Office may end up with Error code 0-1009 (0)

Step 1. Temporarily disable Firewall and Antivirus

Error code 0-1009 (0)  while installing or updating the Microsoft Office may occur in case of Network or firewall restriction. The network rules or firewall rules in the network/computer may block the installation of Office program or its updating as a part of their security measurements. These firewall rules and Antivirus are implemented on the computer by the network provider or the computer user on its core system or registry.
You could fix the Error code 0-1009 (0) by disabling the firewall or antivirus temporarily or you could fix the Error code 0-1009 (0) by making creating an exceptional rule for Microsoft Office installation or update.

Step 2. SFC Scan to fix Error code 0-1009 (0)   

Error code 0-1009 (0) also occurs in case of system file errors or corruption. If the Error code 0-1009 (0) is occurred due to the system file corruption, it could be fixed easily by the SFC scan. The SFC scan or system file checking scan is the process of replacing or repairing the corrupted copy of system files using the cached copy of the file from the directory.
Follow the steps to initiate SFC scan:
Step 1. Open command prompt in administrative privileges.
Step 2. Type “ sfc /scannow “ and click enter.
Step 3. The scan will begin automatically .
Step 4. Do not close the command prompt until the scan get completed.
Step 5. Try installing or updating Microsoft Office and check whether the Error code 0-1009 (0)  is fixed.
Step 3. Registry repair to fix Error code 0-1009 (0)
Error code 0-1009 (0)  also occurs due to registry corruption or key value errors. A single key value corruption or change may lead to malfunctioning of the entire Microsoft Office program.
In order to fix Error code 0-1009 (0) it is required to repair the registry keys and rebuilt the string values. And we request you to back up the registry before initiating the registry repair as registry is a highly sensitive element of a computer system and it is recommended to be done in the presence of Online or offline technician.
For more information on back up of registry follow the Microsoft kb article 322756
Follow the steps to repair registry:
Step 1. Open registry editor
Step 2. Delete the preinstalled or older registry key which block the installation of latest version or update.
Step 3. Navigate the below keys and delete it.
HKEY_CURRENT_USER\Software\Microsoft\Office\11.0
HKEY_CURRENT_USER\Software\Microsoft\Office\12.0
HKEY_CURRENT_USER\Software\Microsoft\Office\14.0
HKEY_CURRENT_USER\Software\Microsoft\Office\15.0
HKEY_CURRENT_USER\Software\Wow6432Node\Microsoft\Office\11.0
HKEY_CURRENT_USER\Software\Wow6432Node\Microsoft\Office\12.0
HKEY_CURRENT_USER\Software\Wow6432Node\Microsoft\Office\14.0
HKEY_CURRENT_USER\Software\Wow6432Node\Microsoft\Office\15.0
Step 5. Also change the DWORD values in below keys from 0 to 1 in Office common registry folder.
LicenseServers
LicenseServerRedirection
AutoExpandDLsEnable
PassportAuthProvider

Solution 4. Remove and reinstallation.

If Error code 0-1009 (0) is not fixed in registry repair, SFC scan and firewall/antivirus exception, it is required to remove the Office suite completely from the programs and features, and then to reinstall the product for a proper use.
Follow the steps given below to fix Error code 0-1009 (0) completely.
Step 1. Open control panel
Step 2. Click on uninstall programs and features
Step 3. Search for Microsoft Office in the list.
Step 4. Select Microsoft Office and click on uninstall.
Step 5. Once uninstall is finished, try running Office setup to install Microsoft Office.

Windows Server 2003 : The Workstation Driver Is Not Installed

THE WORKSTATION DRIVER IS NOT INSTALLED WINDOWS SERVER 2003, ACTIVE DIRECTORY

Fix – The workstation driver is not installed Windows Server 2003, Active Directory

WHEN YOU LOGON TO WINDOWS SERVER 2003, DOES IT SAY “THE WORKSTATION DRIVER IS NOT INSTALLED?” 

WHEN YOU OPEN ACTIVE DIRECTORY, DO YOU SEE “NAMING INFORMATION CANNOT BE LOCATED BECAUSE: THE WORKSTATION DRIVER IS NOT INSTALLED?” 

ALL OF THE NETWORK DRIVES ARE NOT ACCESSIBLE FROM THE CLIENT COMPUTERS & WINDOWS SERVER 2003?

 This happened to us on 17th May, 2017.We had a Windows Server 2003, and all of a sudden, it stopped working. To be exact, all of the client computers including the main server failed to connect to the network drives. No matter where the network drives are located. Also, There were more problems on the Windows Server 2003, Active Directory stopped working. it means we also have login problem with all of our client computers. We tried to restart and restart the server, but it did not help at all. Here we will share few symptoms that we have found out. See the picture below:
 SYMPTOM #1 – ALL NETWORK DRIVE CONNECTION LOST ON CLIENT & SERVER SIDE
the_workstation_driver_is_not_installed1
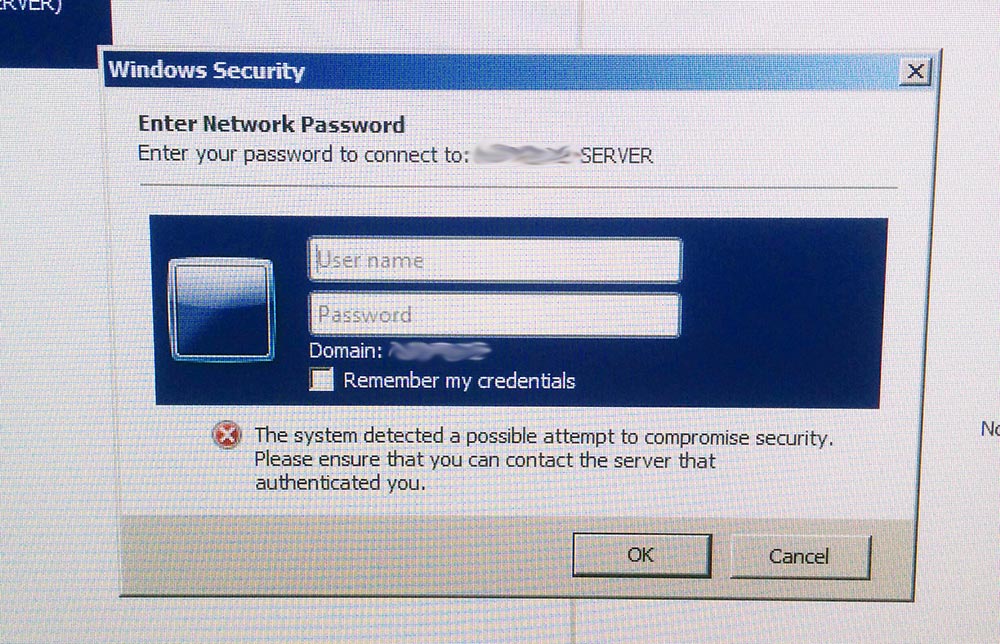
First of all, we noticed a strange thing on a client computer. The previously connected network drives. When we tried to connect a network drive from a client computer (the network drive location is the server), we had the message: The system detected a possible attempt to compromise security. Please ensure that you can contact the server that authenticated you. If we enter a user name and password, it worked until we restart the computer. After restarting, we have this same thing over and over again. We thought this could be a firewall problem, so we did disable the fire on both client and server sides, but no luck. Let’s look at our next symptom.

SYMPTOM #2 – SERVER 2003 ACTIVE DIRECTORY, NAMING INFORMATION CANNOT BE LOCATED BECAUSE: THE WORKSTATION DRIVER IS NOT INSTALLED

the_workstation_driver_is_not_installed2
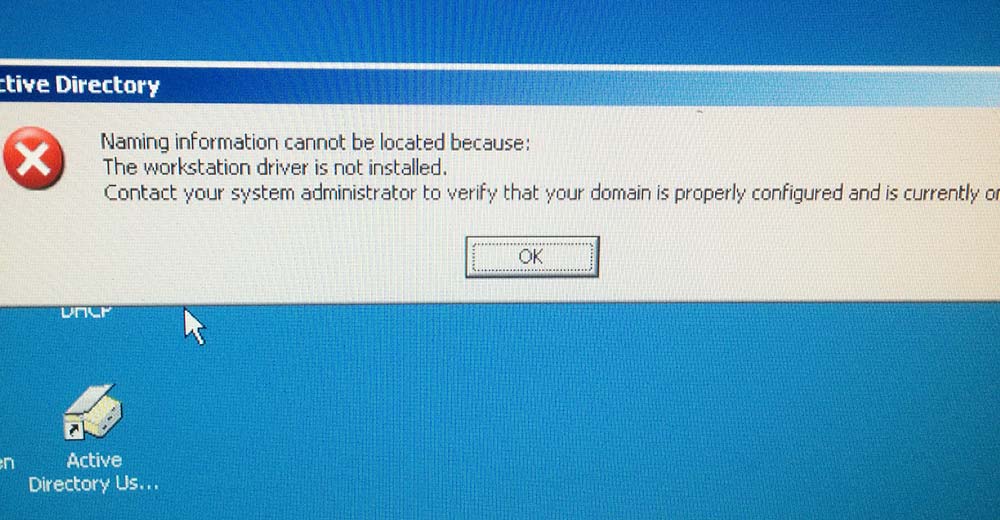
Also, we had a serious problem. When we tried to open Active Directory in Windows Server 2003, it says: Naming information cannot be located because: The workstation driver is not installed. Contact your system administrator to verify that your domain is properly configured and is currently… Anyways, when you click “OK”, Active Directory runs, but all the user information is not available. (All gone!!) We were in panic at this point. We did not have any Windows image backup… We had to fix this to make this Windows Server 2003.
HOW TO FIX “THE WORKSTATION DRIVER IS NOT INSTALLED” IN WINDOWS SERVER 2003

1. STOP MRXDAV AND WEBCLIENT SERVICES AND START AGAIN

After doing a research, some people fixed this problem with this commands in CMD. Open Windows Command Prompt, and type the following: (If the commands does not work for you, try to open command prompt as an administrator)
  • net stop webclient
  • net stop mrxdav
The above commands will stop those services. These ones will start the services again. Type the following to start the services again:
  • net start mrxdav
  • net start webclient
We did try this, and unfortunately, stopping and starting the services did not work for us. We had variety of error occurred messages, and the commands didn’t work. We had to find a different solution, and we did tried the next one.

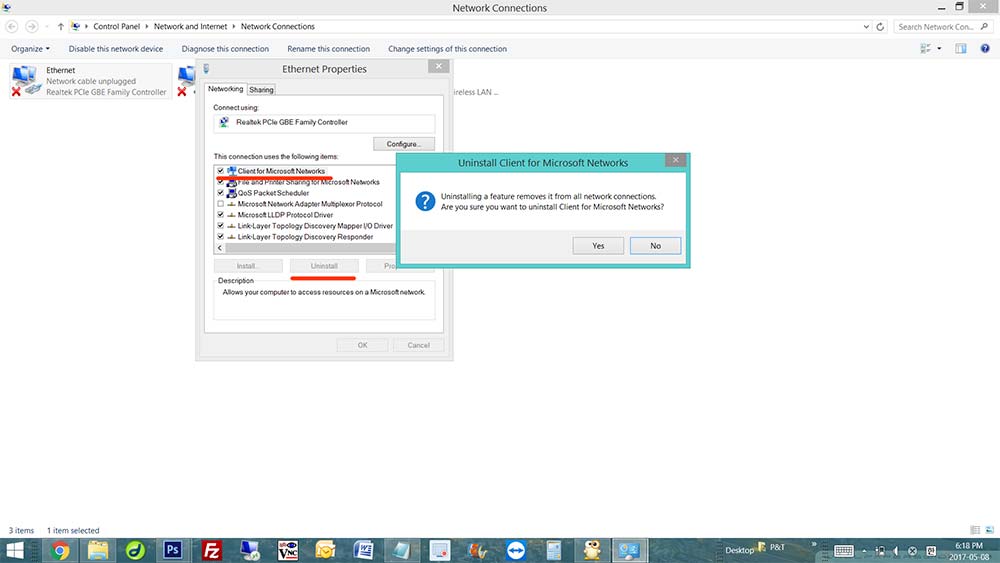
2. UNINSTALL “CLIENT FOR MICROSOFT NETWORKS” AND INSTALL AGAIN ON WINDOWS SERVER 2003

Go to “Control Panel“, and click “Network Connections“. Right-click your current network adapter, and click “Properties“. (Could be a wireless or a wired interface) Find and uninstall “Client for Microsoft Networks“. After uninstalling the item, click “Install” and choose “Client for Microsoft Networks” to install again (When you install Client for Microsoft Networks, it is located under Client category). If Windows asks you to restart, restart your Windows Server 2003. 
the_workstation_driver_is_not_installed3
This second method actually fixed our problem.

You've been signed in with a temporary profile

Information
This is for when after you sign in to a user account in Windows 8, and notice that a temporary profile has been loaded instead of the profile that corresponds to the current user. Therefore, any changes that you make to the current desktop are lost after you sign out. Additionally, the notification area may display the following error message:

You've been signed in with a temporary profile.
You can't access your files, and files created in this profile will be deleted when you sign out. To fix this, sign out and try signing in later. Please see the event log for more details or contact your system administrator.

This problem usually occurs if the user profile of the account was accidentally corrupted or deleted from the system.


This tutorial will show you how to fix the "You've been signed in with a temporary profile" error a user may get after signing in to their account in Windows 8, Windows RT, Windows 8.1, andWindows RT 8.1.


Here's How:

1. If you have another administrator account that is not affected by this user profile error, then sign out of the affected account (ex: Brink), and sign in to the other administrator account.

Note
If you do not have another administrator account to sign in to, then you could do one of the following options below to enable the built-in Administrator account to sign in to, and continue on to step 2below.

A) If the affected account is an administrator, then enable the built-in Administrator account, sign out, and sign in to Administrator.

OR

B) Boot into safe mode, enable the built-in Administrator, sign out, and sign in to Administrator.


2. Back up anything that you do not want to lose in the C:\Users\(user-name) profile folder (ex: Brink) of the affected user account to another location. When finished, delete the C:\Users\(user-name) folder.

3. Press the + R keys to open the Run dialog, type regedit, and click/tap on OK.

4. If prompted by UAC, then click/tap on Yes.

5. In Registry Editor, navigate to the location below. (see screenshot below)

HKEY_LOCAL_MACHINE\SOFTWARE\Microsoft\Windows NT\CurrentVersion\ProfileList


6. In the left pane under ProfileList, click on a SID key (S-1-5-21....long number). (see screenshot above)
NOTE: Usually, it will be for the SID key that has .bak at the end of the long number.

A) In the right pane of the SID key, look at the ProfileImagePath value to see if it is for the same user account name (ex: Brink) that has the user profile error.

B) If not, then repeat step 6 until your find it, then go to step 7 below.

7. Right click or press and hold on the SID key (ex: ...-1006.bak) found in step 6, and click/tap on Delete. (see screenshot below step 5)

8. Click/tap on Yes to confirm. (see screenshot below)


9. If there is another SID key (ex: ...-1006 at end) with the exact same long number from step 6 for the same user account (ex: Brink) without .bak at the end of it, then repeat step 7 and 8 above for it as well.


10. When finished, close Registry Editor.

11. See if you are now able to sign in to the user account (ex: Brink) from step 1 without getting the "You've been signed in with a temporary profile" error.

12. If successful, the affected account's (ex: Brink) user profile will be recreated and no longer receives the error. You can then copy any files you want back from the back up created at step 2.


Source : eightforms.com

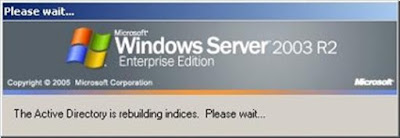
The active directory is rebuilding indices please wait...

Problem Error "The active directory is rebuilding indices please wait” in Windows Server 2003. Operating system Windows 2003 server...